Tuesday, December 8, 2009

Oh, It's Been a While....

So I have been busy, just like the rest of the world....I know it's no excuse and my friends have been on me to update my blog. So sorry to all of my wonderful followers that there has been this lapse in my little life of blogging.

I have been wondering if the well will ever run dry, If I will one day run out of ideas to blog about. For now I'm still kickin it.... but that day may come and I just want to THANK all of my readers and followers for taking the time out of your busy lives to stop by this Small Towne Home of mine. It means the world to me that you are interested in what I have to share.


Here's to many more days of blogging!!!

My very first Advent Tea.....

My girlfriend and I hosted our very first Advent Tea at Church this year.
It was a wonderful evening, filled with Friendship, Love, and HOPE.
See the cutesie jars on the table. Can you guess what's inside?? It's a cupcake....yes a decorated cupcake. I'm so bummed that I don't have a better picture. Guess I'll have to make them again so I can take a picture.


The dessert stand in the middle of the table was made by my friend. We bought two plates, one bowl and two candle holders at the Dollar Store, glued them to make this fancy stand that serves many purposes. (I have a candle with greenery and pine cones on it now). Pretty good for $5. I will be making many more of these....have so many ideas!! I will surely post when their done!

Thursday, November 19, 2009

Easy Handmade Gift....

If your one of my many friends or family members that may be reading this you may want to stop right here, turn around, close your eyes. If you don't want to spoil your very special handmade gift....STOP Right Now!!

Coasters Anyone??
These are super easy and inexpensive to make. Who wouldn't love a set of these.....I hope everybody, cause that's who is getting them from me this year!

Okay I'll give you the dish on how to make these beauty's!
1. Go to Home Depot.....Buy these lovely 4x4 tumbled marble tiles.
2. While at Home Depot pick up a roll of Con-Tact Cork liner with adhesive (in the wallpaper isle near the drawer liners).
3. You will also need a paint pen, a set of stencils, and a clear coat sealer/protectant.
4. Center your stencil on the tile, with your paint pen trace the letter onto the tile. *Be careful not to touch the paint pen too close to the stencil this will cause the paint to bleed under the stencil which will create a BIG mess--trust me* Stay about an 1/8 of an inch from the stencil. Carefully remove your stencil, go back and touch up any spots free hand.
5. Allow your letters to dry.
6. Measure and cut the cork liner to fit on the bottom of the tiles. Apply the cork to the tiles--apply pressure so the adhesive on the cork adheres to the tile.
7. Spray the tile with 1-2 coats of clear sealer.
8. Tie with a bow~Give to all you know!!

Wednesday, November 18, 2009

Pillow Talk....

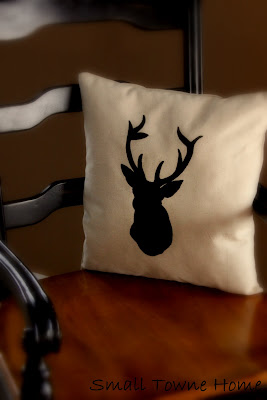
Here is a pillow I recently made for the living room.....If you could see our living room, you would understand. It's basically a mortuary for animals. Let's see how many trophy's we can fit on one wall!! Ten years ago I would of never imagined myself having a home with a bunch of dead animals on the wall, but here I am today and instead of complaining about it, I'm embracing it. Adding my own little touches of the wild to make it a little more feminine.
The fabric is actually a leftover drop cloth that I am using to make curtains. I found this picture on the Internet and printed it out. Cut the deer out and traced around the outline directly onto the fabric with those awesome paint pens. Once outlined I filled in the center and fixed up the outside. I sewed the fabric together and filled with the plastic bags I have been saving from the grocery store. So if your not so much into wild animals on pillows for your living room, I understand but just imagine the possibilities maybe a monogram of your last name. Wouldn't that be perty.

Christmas Bulb Wreath...


These are plastic bulbs purchased from Hobby Lobby....They have a whole isle of the plastic bulbs any color you could possibly want. I stuck with red and silver....
1. Remove the top of the bulbs and place hot glue around the outside, place the top of the bulb back on and allow the glue to dry. (This is so the tops are secure).

2. Shape your metal coat hanger in a circular shape. (you will leave the hook on the hanger this will allow you to hang wreath easily).

3. String the bulbs onto the coat hanger. I did... 3 red---1 silver. (be creative) You will see the more you add the fuller the wreath will be, just keep adding until it is full.

4. Connect the ends to create your wreath. I added some small bulb garland and a bow for a complete look.

I used somewhere around 55 bulbs, this will depend on the size of the bulbs and your coat hanger. I figure it cost me around $18 to complete this wreath.

Happy Wreath Making!!

Monday, November 16, 2009

Mod Podge....

I looove Mod Podge, it's so easy to work with and I love the results.

Plain ordinary pumpkin + torn scrapbook paper + Mod Podge = This Beauty

Sewing Day....

Whew!! Today I finally finished my window coverings in the kitchen.
It looks like a totally different kitchen.

Sorry I have no before pictures.....just imagine bare windows.


This is a shelf that I've had from Hobby Lobby that I could not find a home for in this new house. So I painted it black stapled the fabric to the back and hung the shelf above the window.

I have to say I found the perfect home for the shelf.


I have to say I am not a huge fan of vertical blinds, but they were here when we bought the house and they work well for privacy and keeping the sun out when we sit down to dinner. So I racked my brain to try to make them a little perty (if that's possible). I think it worked, I'm a little happier with them anyways....That's all that matters!
Last but not least..... Using the leftover fabric to make a table runner.
Now I can say, I have one room complete, (well the window's anyways, I have a whole new project I will jump into after Christmas....can't wait to get started). So on to the next.
Tomorrow: Living Room windows

Thursday, November 5, 2009

A New Family Tradition.....

For the last few years I have been trying to implement a new Christmas family tradition. A tradition that I think would be a fun, meaningful and maybe even a little necessary. I will admit we go a little overboard buying gifts at Christmas time. While it is fun buying, wrapping and unwrapping in the end I always believe we have way to much stuff.

I know being creative and crafty may not be for everyone and I understand this. But I also believe it does not matter how perfect your gift turns out, it was the thought put into it that means the most in the end.

So I am determined to have a Handmade Christmas this year, I know I will not be able to put an end to all gift buying from the big box stores. I vow to make at least one handmade gift for each recipient this year, I will also help my children to create handmade gifts for each person on their list. While everyone may not be on board with this new tradition, they will hopefully enjoy the handmade gifts and see how excited the children are when they tell them it is handmade by ME.

And who knows hopefully I am wrong and everyone steps up to the plate.....Wouldn't that be exciting, seeing all the wonderful gifts that your family put their hearts and their hands into.

While I have not decided on gifts for everyone yet, I will post them when they are completed. Hopefully, giving you a little inspiration for a Handmade Christmas. Maybe this could be a new tradition for your family too!


Photo courtesy Martha Stewart

Wednesday, November 4, 2009

Dollar Store Finds....


Here are a few items that I found on my trip to the $ Store.
Lately there has been a buzz about finding inexpensive items and turning them into something unique. So I thought I would try it out.


A white dinner plate~Added some chalkboard paint & a bow.


I found the perfect place for the plate above my cabinets.

Family sign~ Spray painted with a coat of black spray paint, let dry & finished with a coat of ivory spray paint. Sanded with a sanding block for a rustic look.

Displayed on top of my new wine rack....That I heart!!

So, I don't think I did to bad for two dollars plus the paint.
The Dollar Tree crew may just get to know me by name!!

Monday, November 2, 2009

Mr. Turkey....


Last Thanksgiving the kids helped me put this yummy turkey together.

What a cute centerpiece for the Thanksgiving table.


This is what we used

Body~Cantaloupe

Head~Potato

Red Wattle~Red Pepper

Eyes~Black Olives

Wings~Cubed cheese, Sausage & Olives


To attach the head to the body use two wooden skewers, stick them through the potato into the cantaloupe and break off the part of the skewer that is sticking out.

Alternate cheese, olives and sausage on the wooden skewers for the wings and stick into the cantaloupe. Attach eyes and red wattle with a toothpick.

Arrange extra sausage, cheese & olives around Mr. Turkey!

Ta Da!!!

Wednesday, October 28, 2009

I AM A ROBOT.....


I think Mr. outdid himself this year. This is the first year he was given an assignment to complete little Mr.'s costume and WOW is all I have to say. I also have given myself the assignment of little Miss' costume and I have to say it's not quite done yet.....I will probably be working on it Thursday night so it's ready for her Friday Halloween party!! But that's just how I roll......

I will also be carving pumpkins, making cookies, chili, and roasting pumpkin seeds for Saturday, you know I've only known that Halloween is on the 31st for how many years now! But I'm confident that everything will be done. So here's to all the procrastinators!!! I better get to work.

Thursday, October 22, 2009

Had to copy this idea...Thanks Jen!

Burlap Pillows
Got this wonderful idea from a very talented blogger here in blogland, I just had to try my hand at it. I think they turned out pretty darn good.

Added a little Bling....wow that's so not me, but I Lovvve it.


Look how beautiful it is on my rocking chair, think I'm going to have to make a few more. The very talented Jen at Tatertots and Jello and been so kind to create a tutorial for you if you to feel the urge to make a couple burlap pillows. She has ton's of creative ideas so go check her out.

Life just got a little easier

Okay so one of my biggest dilemma's is deciding what I am going to cook for dinner on a daily basis. I usually wait until the afternoon of, which then is too late to prepare a wonderful meal. So instead we end up eating soup, sandwiches, tacos, waffles, etc. you get my drift.


So when I found this site, I was excited.....They have some recipes that look pretty yummy, with ingredients that I have actually heard of. Now I can tell you I probably will not make all 5 recipes every week but maybe 2 or 3 to start off. Baby steps.... When you sign up, they will send you a weeks worth of recipes on Thursday so you can plan your grocery list and dinners for the following week.


This Week's Menu
Balsamic Chicken Under Bricks,
Roasted Peppery Pork Chops,
Shrimp Pad Thai,
Chicken Sausage and Pepper Soup with Homemade Basil Croutons,
Creamy Dreamy Mac and Cheese
So these ladies have laid out all the work for me....No more excuses.
I vow to my family to start being a little more attentive when it comes to dinner.
So here it is....GO, sign up and make your life a little easier!

Monday, October 19, 2009

A Man & His Dog

Isn't this sunrise beautiful?? This is one of hubby's hobbies....leaving the house at 4am to watch the sunrise and hopefully have a good day of hunting.

And this not so little guy, will give him a hand retrieving the birds. On this particular day he retrieved 12 birds. Good Boy!!

If only he could help me with my shopping bags, then he would be Women's Best Friend.

And this is the yummy meal that hubby made with the Green Wing Teal he brought home.


Green Wing Teal wrapped in Bacon

*Green Wing Duck Breast


*Jalapenos


*Smoked Gouda Cheese


* Bacon


Marinate duck in Italian dressing for 24 hours. After marinated, brown on the grill for 1 minute on each side. Cut jalapenos in half longways-remove all insides/seeds. Slice a thin piece of Gouda cheese and lay on the jalapeno then place duck on top of cheese. Wrap with bacon and secure with a toothpick. Place on grill for about 4-5min on each side or until bacon is thoroughly cooked.


** Please note** I usually do not like wild game it's just too gamey for me but this recipe was fabulous, I was asking for seconds. So if you have some extra duck laying around you should try this recipe!!

Saturday, October 17, 2009

Trick or Treat

Be ready for those Trick or Treaters with this easy project.
-Treat Jar-
*Terracotta Pot
*Black Craft Paint
*Paint Brush
I made a stencil for this pumpkin face and painted with black paint.
Although....
They make these wondrous paint markers.

You could free hand the pumpkin face with them. They are very easy to use.
Oh I wish I would of thought of that when I was doing this project the first time. Now I'm going to have to make another one or two or three..... of these with the paint markers.
Have a Great weekend!

Thursday, October 15, 2009

A New Love of Mine....


Okay I'll be honest with you I am not a professional photographer although sometimes I like to tell myself I am. But this new love of mine....makes it so much easier to pretend. Here is the before and after picture once I was done using Picasa.


It is a super easy program to use, now I've used Photoshop and many other programs and I have to tell you this is by far one of the best for quick & easy editing. And your not going to believe this, it's FREE!!


So there you have it....you all know my secret now.


So try it out for yourself!


http://picasa.google.com/


Wednesday, October 14, 2009

Yummy....

Blackberry & Raspberry Freezer Jam

If you have never made freezer jam you should. It is so super easy and so very tasty. Every fall I have this great idea of canning the harvest of summer, which later turns out to be a not so great idea. You may know what I'm talking about.....But this year was different, I wanted to try making freezer jam and I'm so glad I did.


This is all you need
3 cups crushed berries (6 6oz. containers)
5 1/4 cups sugar
Ball Original Fruit Pectin
Canning jars or freezer safe containers
In the Pectin box is a pamphlet of recipes for jam using various fruits.

What a great gift for neighbors (neighbors love it), teachers, friends you name it who wouldn't love to get a jar of homemade jam. Tie a bow and Ta Da......


Lately this has been my choice breakfast, crusty bread with homemade jam. Yum!!
Now go try it....


Monday, October 12, 2009

A few of my favorite Fall things.....

-My Front Door-


Welcome Platter is a sliver platter purchased from ReStore for $1 add Chalkboard spray paint and a ribbon Ta Da!!!! Easy as Pumpkin Pie.


-Lantern Pumpkins-

They are absolutely adorable-made from Ball jars, tissue paper & Modge Podge!


Look how cute they will look lining my sidewalk on Halloween!!


-Jack-o-Lanterns-


The orange pumkins needed a facelift, so I decided to spruce them up with a little black spray paint...I love them, however the kiddos were not so thrilled about black pumpkins.


-Mantle-

-Happy Fall-

Sunday, October 11, 2009

Yippee!!!
My Very First Post...


I took my brand new camera out to the park today to snap a few shots of these beautiful babes. I cannot think of a better way to highlight my very first post than a wonderful day in the park!