Thursday, February 18, 2010

Photo Fun.....

Mid Winter Break Fun!!!

While the kids were on Mid-Winter Break we had some fun with photos!

But by the end the boy had enough!!!


One of my favorites!

Saturday, January 23, 2010

Christmas Pictures....


Stacy.....This One's For You!!

So it's been a while, I know I know.....I'm so very sorry to ALL my loyal readers!!


Somehow LIFE just managed to step in the way of crafting and blogging. With the Holidays, which consumed a majority of my time..... Planning, preparing and un-planning. Then my beautiful daughter celebrated her 8th birthday with a trip to Chicago to visit the American Girl Doll Store.

Which I have to say was so much fun.....Although I should not speak for my son and hubby, they probably could have done with a little less time in the doll store, by the third visit you could see it on their faces. They were troopers though, I know little miss and I are in for it when the boys plan the next vacation.

Here is the latest project I have been working on--It is a quick and easy personalized project that would be a perfect gift for Mother's day or Father's day.

You will need the following to complete this project.

Ceramic Tile (I used an 8x10)

Photo to fit the size of your tile

Scrapbook Paper

Ribbon & Embellishments

Sturdy Easel (to hold up your tile)

Modge Podge & Brush/Foam

Nail File/Sanding block

1. Cut your picture and scrapbook paper to the desired width. I left about a 1/4 space from each side of the tile.

2. Apply Modge Podge with a brush to the back of the picture and scrapbook paper and apply to the ceramic tile making sure position is straight.

3. Allow to dry for a few minutes, carefully sand the edges of the picture and scrapbook paper (so it blends with the tile).

4. Make sure surface is free from debris, apply Modge Podge over entire surface of the ceramic tile, allow to dry and reapply. It may need three to four coats.

5. Once the surface of the tile is completely dry you are ready to add your embellishments. Attach with a sturdy glue (I used a hot glue gun).

6. Display on an easel.....Beautiful!!!


Tuesday, December 8, 2009

Oh, It's Been a While....

So I have been busy, just like the rest of the world....I know it's no excuse and my friends have been on me to update my blog. So sorry to all of my wonderful followers that there has been this lapse in my little life of blogging.

I have been wondering if the well will ever run dry, If I will one day run out of ideas to blog about. For now I'm still kickin it.... but that day may come and I just want to THANK all of my readers and followers for taking the time out of your busy lives to stop by this Small Towne Home of mine. It means the world to me that you are interested in what I have to share.


Here's to many more days of blogging!!!
My very first Advent Tea.....

My girlfriend and I hosted our very first Advent Tea at Church this year.
It was a wonderful evening, filled with Friendship, Love, and HOPE.
See the cutesie jars on the table. Can you guess what's inside?? It's a cupcake....yes a decorated cupcake. I'm so bummed that I don't have a better picture. Guess I'll have to make them again so I can take a picture.


The dessert stand in the middle of the table was made by my friend. We bought two plates, one bowl and two candle holders at the Dollar Store, glued them to make this fancy stand that serves many purposes. (I have a candle with greenery and pine cones on it now). Pretty good for $5. I will be making many more of these....have so many ideas!! I will surely post when their done!

Thursday, November 19, 2009

Easy Handmade Gift....

If your one of my many friends or family members that may be reading this you may want to stop right here, turn around, close your eyes. If you don't want to spoil your very special handmade gift....STOP Right Now!!

Coasters Anyone??
These are super easy and inexpensive to make. Who wouldn't love a set of these.....I hope everybody, cause that's who is getting them from me this year!

Okay I'll give you the dish on how to make these beauty's!
1. Go to Home Depot.....Buy these lovely 4x4 tumbled marble tiles.
2. While at Home Depot pick up a roll of Con-Tact Cork liner with adhesive (in the wallpaper isle near the drawer liners).
3. You will also need a paint pen, a set of stencils, and a clear coat sealer/protectant.
4. Center your stencil on the tile, with your paint pen trace the letter onto the tile. *Be careful not to touch the paint pen too close to the stencil this will cause the paint to bleed under the stencil which will create a BIG mess--trust me* Stay about an 1/8 of an inch from the stencil. Carefully remove your stencil, go back and touch up any spots free hand.
5. Allow your letters to dry.
6. Measure and cut the cork liner to fit on the bottom of the tiles. Apply the cork to the tiles--apply pressure so the adhesive on the cork adheres to the tile.
7. Spray the tile with 1-2 coats of clear sealer.
8. Tie with a bow~Give to all you know!!

Wednesday, November 18, 2009

Pillow Talk....

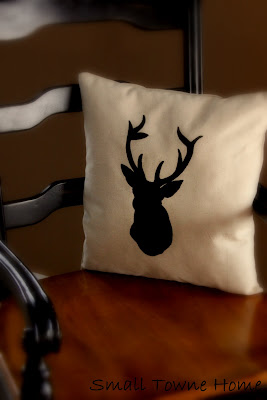
Here is a pillow I recently made for the living room.....If you could see our living room, you would understand. It's basically a mortuary for animals. Let's see how many trophy's we can fit on one wall!! Ten years ago I would of never imagined myself having a home with a bunch of dead animals on the wall, but here I am today and instead of complaining about it, I'm embracing it. Adding my own little touches of the wild to make it a little more feminine.
The fabric is actually a leftover drop cloth that I am using to make curtains. I found this picture on the Internet and printed it out. Cut the deer out and traced around the outline directly onto the fabric with those awesome paint pens. Once outlined I filled in the center and fixed up the outside. I sewed the fabric together and filled with the plastic bags I have been saving from the grocery store. So if your not so much into wild animals on pillows for your living room, I understand but just imagine the possibilities maybe a monogram of your last name. Wouldn't that be perty.